السلام عليكم ورحمة الله وبركاتهـ
حيآكم اللهـ
درس بصرآحهـ جداً خرافي
تطبيقهـ للي يمارس الفوتوشوب بالانجليزي سهل عليهـ
فيه فائدهـ كبيرهـ ،، مجرد تطبيقك او المحاوله
راح تضيف لرصيدك لمسات وافكار حلوهـ
ومو شرط طبق التصميم
طبعاً موضح بكل خطوهـ الصور المضافة وعلى شكل رابط ازرق،،!
اللي عندهـ اي ملاحظات يستفسر وانا بالخدمهـ
اترككم مع الدرس،،!
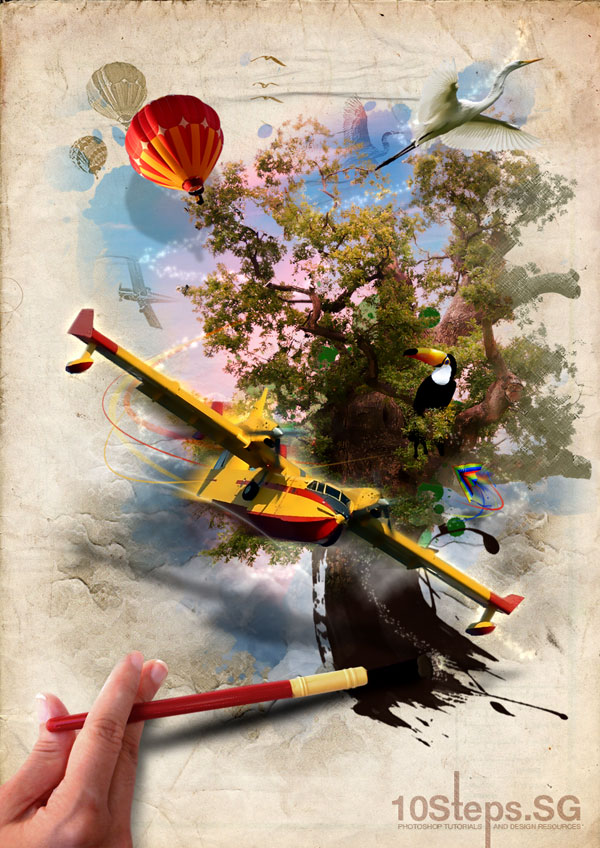
How to Create an Imaginative, Magical Painted Scene
Preparation
Before you start take a look at the images we'll be using:
Paper Texture from Bashcorpo,
Sky from Neoikeia,
Paint Brushes from Nyssi,
Tree from WolfC Stock,
Stroke Brush Set from FlightOfGrey,
Toucan from sxc,
Airplane from sxc, and
Hand holding brush from sxc.
Step 1
Create a document with size 827px by 1169px. Download the
Paper Texture from Bashcorpo and resize it to fit into
the document.

Step 2
Then we will need an image of a cloudy sky. I found a pretty one
sky image by Neoikeia. Resize the sky image and place it at the center of the document. Use Lasso Tool to draw an irregular selection as shown.
Go to Select > Modify > Feather. Set the Feather Radius to 30px. Follow by Select > Inverse then press Delete. Duplicate twice for this sky image as we will be using them later. Rename the sky layers (from bottom up) as "Sky 1," "Sky 2" and "Sky 3" respectively. Hide "Sky 2" and "Sky 3" for now.

Step 3
Select the "Sky 1" layer, go to Image > Adjustments > Desaturate. Then follow by Image > Adjustments > Hue/Saturation. Check on Colorize. Set the Hue to 30, Saturation to 20 and Lightness to 30. Go to Filter > Brush Strokes > Crosshatch. Set the Stroke Length to 50, Sharpness to 20 and Strength to 1. Set the Blend Mode of this layer to Linear Burn.

Step 4
Unhide the "Sky 3" layer. Go to Filter > Stylize > Glowing Edges. Then follow by Image > Adjustments > Desaturate. Set the Blend Mode of this layer to Multiply.

Step 5
Unhide the "Sky 2" layer. Create a Layer Mask on the "Sky 2" layer. Fill the mask with black. Download the Paint Brushes from Nyssi. Set the foreground color to white. Using the brushes downloaded, paint the layer mask to reveal part of the sky image. Then go to Filter > Paint Daubs. Set the Brush Size to 5, Sharpness to 7 and Brush Type to Simple.

Step 6
Let's proceed on to the tree. Download the
tree image made by WolfC Stock. Extract the tree away from its background using the Extract Tool (
Click here for other methods of extraction). Position it as shown. Go to Filter > Blur > Smart Blur. Set the Radius to 3 and Threshold to 10.

Step 7
Duplicate the tree image three times, and rename the four layers (from bottom up) as "Painted Tree," "Blurred Tree," "Inverted Tree," and "Outline Tree." We will get on to them one by one now. Select the "Inverted Tree" layer, go to Image > Adjustments > Invert.

Step 8
Set the Blend Mode of the "Inverted Tree" layer to Color Dodge. Using the Brush Tool (set the color to black, size to 200, and Opacity to 40%), paint over the inverted tree and you will add the highlight.
Select the "Outline Tree" layer, go to Filter > Stylize > Glowing Edges, then Image > Adjustments > Desaturate ,and follow by Image > Adjustments > Invert. Set the Blend Mode of the "Outline Tree" layer to Multiply.

Step 9
Now hide the "Blurred Tree," "Inverted Tree," and "Outline Tree" layers. Select the "Painted Tree" layer and go to Image > Adjustments > Desaturate. Then Filter > Brush Strokes > Cross Hatch. Set the Stroke Length to 20, Sharpness to 20, and Strength to 1. Follow by Image > Adjustments > Hue/Saturation, and Check on Colorize. Set the Hue to 30, Saturation to 20 and Lightness to 30.

Step 10
Unhide all the tree layers and create a group folder. Place the "Outline Tree," "Inverted Tree," and "Blurred Tree" layers into the folder. Select the folder and create a Layer Mask. Fill the layer mask with black. Using the paint brushes downloaded earlier, paint the layer mask to reveal part of the tree image.

يتبع


المفضلات