


Step 20
Duplicate the "Plane" layer. Select the "bottom plane" layer and go to Filter > Blur > Motion Blur. Set the Angle to 90 and Distance to 20. Move the blurred plane slightly to its left.
Step 21
Create a new layer and name it "Line." Using the Pen Tool, draw a path as shown below.
Step 22
Select the Brush Tool, set the size to 3px and color to #C83926. Right-click on the path you have drawn earlier, and choose Stroke Path. Check on Simulate Pressure and Type to Brush.
Step 23
Repeat Step 22 for a few more lines with different colors.
Step 24
Duplicate the original "Plane" layer. Select the duplicated plane and go to Image > Adjustments > Hue/Saturation. Set the Lightness to 0, then go to Filter > Blur > Gaussian Blur, and set the radius to 10px. Follow by Edit > Free Transform. Resize the plane shadow and move it under the original plane. Set the Opacity of this layer to 40%.
Step 25
Repeat Steps 19 to 24 for a colorful kite at the right side of the tree.
Step 26
Download an image of a hand holding brush from sxc.hu. Extract the hand and brush from their background and position it the way shown in the diagram.
Step 27
Duplicate the "Hand" layer. Select the duplicated hand and go to Image > Adjustments > Hue/Saturation. Set the Lightness to 0, then go to Filter > Blur > Gaussian Blur and set the radius to 10px. Now go to Edit > Free Transform. Rotate the shadow slightly so the two tips of the brushes meet.
Step 28
Create a new layer above the brush. Place a small drop of paint at the tip of the brush with color #251A10. Right-click on this layer and choose Blending Options. Check on Bevel and Emboss. Set the Depth to 1, Size to 5, Angle to 165, Highlight Opacity to 30, and leave the rest as default.
Step 29
Create a new layer above the plane. Using the Lasso Tool, draw an irregular selection around the plane.
Step 30
With the selection, go to Select > Modify > Feather. Set the Feather Radius to 30px. Then go to Filter > Render > Clouds. Set the Blend Mode of this layer to Hard Light.
Step 31
Create one last new layer. Select the Brush Tool, pick the default Star 33 pixels brush and open up the Brush Palette. In the palette, check on Shape Dynamics. Set the Size Jitter to 100 and Minimum Diameter to 0
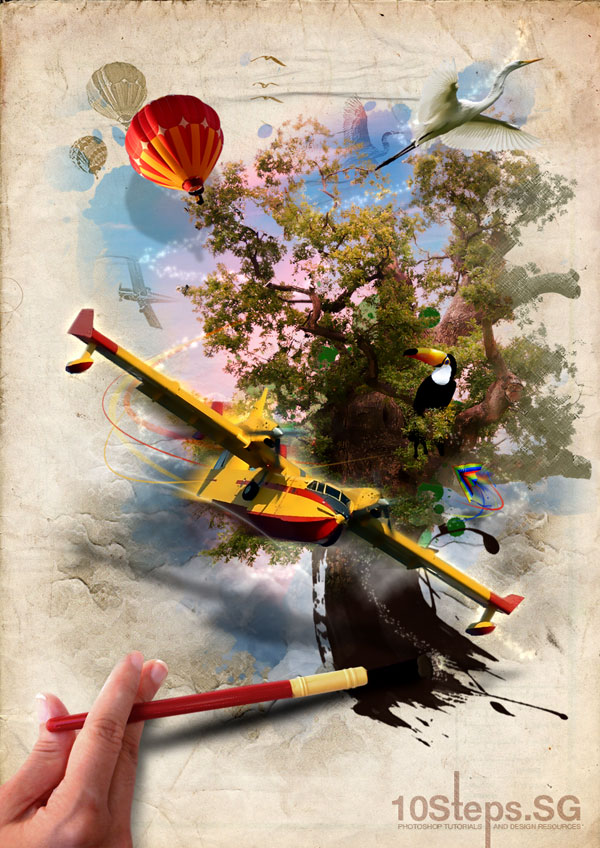
Conclusion
The final image is below. I hope you enjoyed this tutorial and I look forward to seeing your results!
اتمنى اشوف مدى انطباعك عن الدرس
ودي لكم
.
.


المفضلات